We hate to break it to you, but it doesn't look as if GIFs are disappearing anytime soon. Those ancient animated images — once limited to gaudy "under construction" signs and chain-mail fodder — are receiving a new lease on life as of late, thanks to a little something called cinemagraphs.
This is actually just a fancy name for an animated GIF, but specially designed with a purposeful artistic goal. One photographer, Fernando J Baez, describes the technique as "more than a photo, but not quite a video." The intent is to augment, or draw attention to, certain aspects of an image through localized animation — for example, a breeze blowing through a subject's hair — and masking the remainder of the animation to appear static. It's by no means a new phenomena, but the technique is a little more involved than creating your average meme-worthy GIF, and can produce some incredibly cool results.
For this to work, you'll need to acquire a copy of Photoshop. That's because Adobe's powerful image manipulation software actually allows us to edit more than just images — there's support for certain video formats too, which is what we'll be using to create our final image. Sound good? Let's get started.
You'll want to find a video or scene that has a good, subtle animation to it — something that can be successfully isolated from the rest of a shot. Anything with too much motion can be complicated to mask, so try to keep things simple. Vimeo is the best place to go looking for beautifully shot, high-quality videos, so we're going to start there, though you can also shoot your own! For this example, we've used a short video of people on an escalator, which should be easy to mask and loop.
First, take your video video into Photoshop, and make sure the Motion workspace is active (found under Window > Workspace). This will give us a simple timeline. Using the blue guides to the left and right of the timeline, select a 1-2 second segment that will form the basis of your cinemagraph. You don't need to be exact, since we can trim some of those extra frames in the next step.
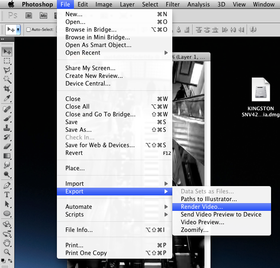
 Once you've selected your segment, we're going to export the selection as a new movie. Choose FIle > Export > Render Video, and accept the default settings. Now, close your document, and choose File > Import > Video Frames to Layers, selecting the video file you just exported. This will import each frame as a new layer, which is crucial for the masking process.
In our sample video, there's lots of motion, with people moving up and down the various escalators —except for one. This escalator is empty, and thus, perfect for animating, while freezing the rest of the busy people pictured in this scene. In the Layers palette, the first layer is going to serve as our animation's anchor frame. With the first layer selected, ensure that "Unify Layer Visibility" is activated. This ensures our static anchor frame will repeat itself in each successive frame.
 Now, the fun part — and also the most time consuming. Select the second layer/frame. Using the marquee tool, or any other selection tool of choice, create a layer mask around the area of motion you'd like to retain. Repeat the process for each frame that follows. You can preview your progress at any time using the motion timeline. If all goes well, you should see a static image, with only the masked areas exhibiting any sign of motion.
Depending on the framerate of your source material, the animation might not be as smooth as you'd like. This can be fixed by selecting every frame in the timeline, right-clicking, and and choosing a new delay value. Try experimenting with different settings to see what works best. Also, you might find that your chosen subject or animation doesn't loop all that smoothly. In some cases, it's a simple matter of copy/pasting all your frames to the end of the timeline, and choosing Reverse Frames from the timeline bar's options menu. This won't work in all instances, however, and could actually produce a robotic/mechanical repetition effect — not exactly the artistic effect we're looking for here.
When that's done, click File > Save for Web & Devices. Make sure that GIF is your selected export format. You an even preview the final image if you'd like. Fernando J Baez recommends running your image through a cross-processing or duo-tone filter, which limits the number of colors in your image to take advantage of the GIF format's shortcomings. Jamie Beck also has a few tips on optimizing the size and color you can get from your final image too. You can try both and see what looks best, though it's not exactly mandatory.
The result should be something similar to our final product, but we hope you can produce something much more impressive! Just be sure to share your results and tips below.
Click here!- Final result...
One of Jamie Beck's animated photographs, otherwise called a cinemagraph.
This is actually just a fancy name for an animated GIF, but specially designed with a purposeful artistic goal. One photographer, Fernando J Baez, describes the technique as "more than a photo, but not quite a video." The intent is to augment, or draw attention to, certain aspects of an image through localized animation — for example, a breeze blowing through a subject's hair — and masking the remainder of the animation to appear static. It's by no means a new phenomena, but the technique is a little more involved than creating your average meme-worthy GIF, and can produce some incredibly cool results.
For this to work, you'll need to acquire a copy of Photoshop. That's because Adobe's powerful image manipulation software actually allows us to edit more than just images — there's support for certain video formats too, which is what we'll be using to create our final image. Sound good? Let's get started.
You'll want to find a video or scene that has a good, subtle animation to it — something that can be successfully isolated from the rest of a shot. Anything with too much motion can be complicated to mask, so try to keep things simple. Vimeo is the best place to go looking for beautifully shot, high-quality videos, so we're going to start there, though you can also shoot your own! For this example, we've used a short video of people on an escalator, which should be easy to mask and loop.
 Once you've selected your segment, we're going to export the selection as a new movie. Choose FIle > Export > Render Video, and accept the default settings. Now, close your document, and choose File > Import > Video Frames to Layers, selecting the video file you just exported. This will import each frame as a new layer, which is crucial for the masking process.
In our sample video, there's lots of motion, with people moving up and down the various escalators —except for one. This escalator is empty, and thus, perfect for animating, while freezing the rest of the busy people pictured in this scene. In the Layers palette, the first layer is going to serve as our animation's anchor frame. With the first layer selected, ensure that "Unify Layer Visibility" is activated. This ensures our static anchor frame will repeat itself in each successive frame.
 Now, the fun part — and also the most time consuming. Select the second layer/frame. Using the marquee tool, or any other selection tool of choice, create a layer mask around the area of motion you'd like to retain. Repeat the process for each frame that follows. You can preview your progress at any time using the motion timeline. If all goes well, you should see a static image, with only the masked areas exhibiting any sign of motion.
Depending on the framerate of your source material, the animation might not be as smooth as you'd like. This can be fixed by selecting every frame in the timeline, right-clicking, and and choosing a new delay value. Try experimenting with different settings to see what works best. Also, you might find that your chosen subject or animation doesn't loop all that smoothly. In some cases, it's a simple matter of copy/pasting all your frames to the end of the timeline, and choosing Reverse Frames from the timeline bar's options menu. This won't work in all instances, however, and could actually produce a robotic/mechanical repetition effect — not exactly the artistic effect we're looking for here.
When that's done, click File > Save for Web & Devices. Make sure that GIF is your selected export format. You an even preview the final image if you'd like. Fernando J Baez recommends running your image through a cross-processing or duo-tone filter, which limits the number of colors in your image to take advantage of the GIF format's shortcomings. Jamie Beck also has a few tips on optimizing the size and color you can get from your final image too. You can try both and see what looks best, though it's not exactly mandatory.
Click here!- Final result...


No comments:
Post a Comment